Custom Search
|
|
  |
|
|
MOUNTING REMOUNTABLE FLANGE
WHEELS.
When you mount a tube tire on a remountable flange wheel, the inner tube
should be prepared and inserted in
the tire in the same manner
used on
a split or divided wheel. The wheel is then
positioned
on a flat surface with the fixed flange down.
Push the tire on the wheel assembly as far as it will
go, and guide the valve stem into the valve slot with
the fingers. Install the remountable flange on the
wheel. Secure the locking ring according to the assembly
instructions required by the applicable wheel
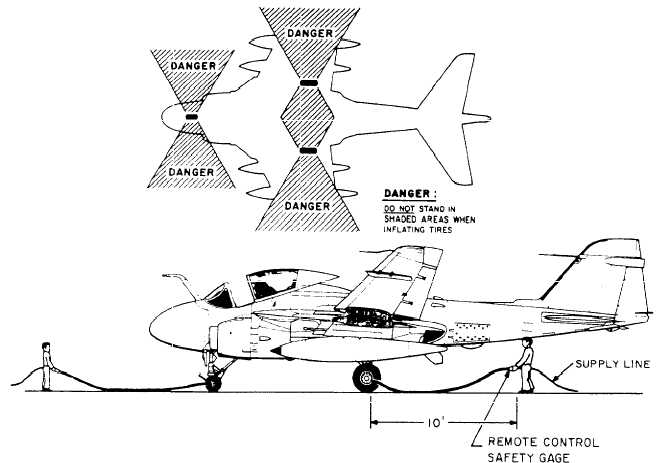
manual. When you mount a tubeless tire on a demountable flange wheel, install the valve stem (valve core removed) in the wheel assembly. Removing the valve core prevents unseating the wheel seal by the pressure built up when the tire is installed. The wheel seal should be lubricated with the same lubricant and in the same manner as previously mentioned for split or divided wheel assemblies using tubeless tires. Install the wheel seal on the flange. Secure the locking ring according to the assembly instructions required by the applicable wheel manual.Tire Inflating According to Federal Specification BB-N-411, water-pumped nitrogen should be used to inflate tires. When nitrogen is not available, dry, oil-free air may be used. Nitrogen is provided in a number of mobile carts. The NAN-2 and NAN-3 carts are shown in figure 11-21. Tire shops are generally equipped with a bulkhead nitrogen outlet.All high-pressure inflation sources should be equipped with a regulator that limits the line pressure to the remote inflator assembly. The regulator should be set to provide a controlled inlet pressure to the inflator. It should not exceed the required tire inflation pressure by more than 50 percent or 600 psi, whichever is less.The tire inflator assembly kit is an excellent maintenance device if it is used and cared for according to the NAVAIR 17-1-123 manual. See figure 11-22. This manual includes the operation
instructions, maintenance instructions, and illustrated parts breakdown for the remote inflator assembly and dual chucks stem gauge.The tire inflator assembly kit consists of a remote controller, a low- and high-pressure gauging element, and a 10-foot service hose. The remote inflator assembly should be calibrated upon initial receipt, before being placed in service, and every 6 months thereafter. The unit is equipped with a built-in relief valve to prevent overpressurization of a tire during inflation. The relief valve should to be set at 20 psi above the maximum pressure required. It should also be sealed with a "calibration void if seal broken" decal. The needs of each activity will be different, depending on the type of aircraft supported. For example, an organizational activity with a single type of aircraft will only need a single inflator assembly. An activity with multiple types of aircraft will need an inflator assembly preset for each type of aircraft, based on the required pressure. Intermediate activities (tire shops) should use two gauge elements. One element for use on tires in the range of 10 to 150 psi. Another for a second inflator with relief pressure set at 500 psi for tires ranging from 136 to 480 psi.The inflator assembly controller relief pressure should be clearly labeled or marked. The carrying case should be labeled with the type of aircraft for which the relief valve is set. Figure 11-23 shows the operators position while servicing tires installed on a aircraft.After the buildup of a new tire at an AIMD or IMA, it should be placed in a safety cage for inflation. A typical safety cage is shown in figure 11-24. The method of inflation used depends on whether a tube or tubeless tire is being inflated.To inflate tube tires, you should remove the valve core and place the wheel assembly in the safety cage. Attach a remote tire inflation gauge assembly to the valve stem. Be sure the inner tube is not being pinched between the tire bead and the wheel flange. On remountable flange wheels, be sure the remountable flange and locking ring are seated properly. Secure the safety cage door and inflate the tire to its maximum operating pressure. This will seat the tire beads against the rim flanges. Deflate the tire
and install the valve core. Then, reinflate the tire to its maximum operation pressure. You should allow the tire to remain at this pressure for a minimum of 10 minutes. At the end of this 10-minute period, there should be no detectable pressure loss.NOTE: Install only aircraft tire valve cores, P/N TRC24 or C4, identified by a slot in the head of the pin. See figure 11-25.If no pressure loss is detected, the tire pressure is reduced to 50 percent of the maximum operating pressure or 100 psi, whichever is less. The tire and wheel assembly is then removed from the safety cage, a valve cap installed, and the assembly stored in a rack, ready for issue. If there is a significant pressure loss, the tire pressure is reduced to 50 percent of the maximum operating pressure or 100 psi, whichever is less. Then, the assembly is removed from the safety cage and the cause of the leak determined. If a slow leak is detected, the air retention test should be extended to
24 hours. If the leakage exceeds 5 percent, the tire should not be issued until remedial action is taken. A loss of pressure less than 5 percent may be experienced during the first 24 hours after initial inflation of a new tire. This is attributed to normal tire stretch. The tire pressure should be adjusted accordingly. Tubeless tires are inflated in the same manner as tube tires except the valve core is not removed. |
 
|
|
|