Custom Search
|
|
|
|
||||
|
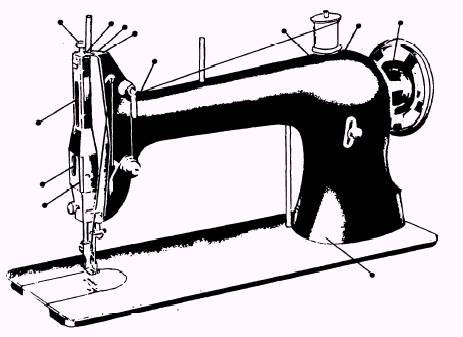
OSCILLATING TYPE SEWING MACHINES Two of the most commonly used oscillating sewing machines are the 31-15 and 7-33, both of which are discussed in this chapter. SINGER SEWING MACHINE 31-15 When starting out as a PR, the 31-15 sewing machine will probably be the one you'll like to use. This machine is smaller and lighter than most of the other machines used in the parachute loft. The manufacturer calls the 31-15 a tailoring machine. It is used to sew and repair clothing, uniforms, shirts, flying clothing, jackets, and lightweight protective covers. The 31-15 is an oscillating sewing machine that has a recommended speed of 2,200 stitches per minute and makes a lockstitch. It is very good for sewing nylon cloth, and can be used for sewing lightweight canvas up to 8 ounces. The number of stitches can be regulated from 7 to 32 stitches per inch. When the 31-15 machine is in operation, the balance wheel turns over toward the operator. When hand-turning the balance wheel, always rotate it in this direction. The components of the Singer Sewing Machine 31-15 are shown in figure 9-2. The following practices and procedures help to ensure safe and smooth operation of the sewing machine: 1. The balance wheel must always turn toward the operator. 2. Do not run the machine with the presser foot resting on the feed dog without material being under the presser foot. 3. Do not run the machine when both bobbin case and needle are threaded unless there is material under the presser foot. 4. Do not try to help the machine by pulling the material. You may bend or break the needle. If properly adjusted, the machine feeds the work without assistance. 5. The slide over the bobbin case should be kept closed when the machine is in operation. 6. Keep your head away from the thread takeup lever and needle bar at the top of the sewing machine face. 7. When running the machine, do not take your eyes away from the needle and presser foot. 8. Keep your fingers from under the needle. 9. When running the machine, keep your fingers away from the belt and pulley areas. 10. Never attempt threading the needle when the machine is turned on. Lubrication To ensure easy operation and to prevent unnecessary wear of the moving parts, all sewing machines need oiling. When a machine is in constant use, it should be oiled twice a day. Anew machine should be oiled more frequently when in constant use. Use only one drop of oil at each oiling point. A 10W mineral oil is recommended. Oiling points for the 31-15 machine are shown in figures 9-3, 9-4, and 9-5. Oil should be applied regularly to the shuttle bearing in the shuttle race. Occasionally, remove the faceplate and apply oil to the bearings and points that are uncovered. Timing the 31-15 There are two distinct timing operations for the 31-15 machine. One operation times the needle with the shuttle; the other timing operation times the feed dog with the needle. Both the needle with the shuttle and the feed dog with the needle must
Figure 9-3.-Oiling points at the front of the machine.
Figure 9-4.-Oiling points at the back of the machine.
Figure 9-5.-0iling points at the base of the machine.
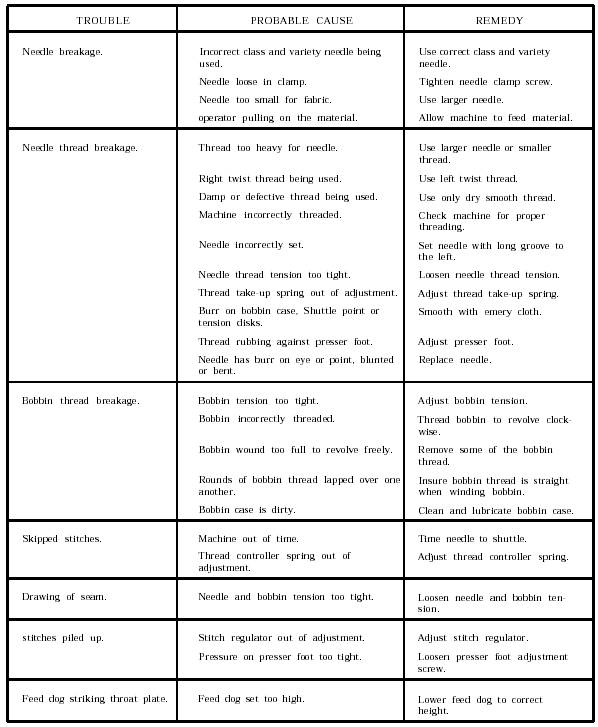
Figure 9-6.-Timing needle with shuttle. be in proper time for the machine to function properly. See figure 9-6. Timing the Needle with the Shuttle If a class 31 sewing machine does not form the lockstitch, if it skips stitches, or if it frays or breaks thread, the needle is not moving in the proper relationship with the shuttles motion. First make sure you have the right needle. Check the needle for the correct class, variety 16 x 87, and size. Insert the needle in the needle bar (long groove to the left) as far as it will go (fig. 9-6). Next compare the needle stroke to the shuttle stroke. To do this, remove the throat plate. Turn the balance wheel toward you until the point of the shuttle on its forward stroke reaches the center of the needle while the needle is on the upstroke. At this time, the needle bar should have risen 1/10 inch and the point of the shuttle should be 1/16 inch above the eye of the needle, as shown in A of figure 9-6. NOTE: Prior to making adjustments to the sewing machine, always follow the troubleshooting chart in Table 9-1. If the needle eye is not in this position, the following steps should be taken: 1. Loosen the needle bar connecting stud screw, as shown in B of figure 9-6. 2. Move the needle bar up or down as required; and then tighten the screw. 3. Rotate the balance wheel through the full cycle to check the timing. 4. Replace the throat plate. Timing the Feed Dog with the Needle The feed driving eccentric is an adjustable connection between the arm shaft (the shaft in the head) and the feed rock shaft (first shaft beneath the bed of the machine). If the feed mechanism is properly timed, the feed dog should be on its downstroke and level with the throat plate when the point of the needle reaches the material. If there is a twisted knot every 1 to 2 inches on the bottom of your material, check the timing of the needle before adjusting the feed mechanism. To adjust the feed eccentric, first lower the stitch regulator to the lowest position so the machine forms its longest stitch. Turn the balance wheel until the feed dog is on its downstroke and is flush with the throat plate. Move to the rear of the machine and take off the arm side cover. Turn the balance wheel away from you until the feed eccentric collar setscrew is visible (fig. 9-7). Hold the collar with your left thumb. Loosen the screw and rotate the balance wheel away from you until the needle, on its downstroke, reaches the material. Tighten the setscrew. Rotate the balance wheel to check the timing. Recheck the timing of the shuttle point with the needle. When you time the feeding mechanism, you may throw the needle out of time with the shuttle.
Figure 9-7.-Feed eccentric.
Table 9-1.-Troubleshooting Chart
Adjusting the Feed Dog The height at which the feed dog should be set depends on the weight and number of plies of the material being sewn. If the feed dog is set too low, the material does not feed through the machine; if it is set too high, it may cut or fray the material. The recommended height of the feed dog for sewing lightweight canopy material is slightly less than one tooth above the throat plate. If you are sewing heavier material, raise the feed dog to a height that ensures positive feeding of the material. After you have decided on the correct height for the project you are working on, adjust the feed dog accordingly, by loosening and then tightening the screw, as shown in figure 9-7. You must remember that each time the height of the feed dog is changed, the feeding mechanism may be out of time. For this reason, set the feed dog first, and then make the necessary adjustment on the feeding mechanism. Since most of your canopy repairs involve material of approximately the same weight, one-time adjustment of the feed dog is usually sufficient. Repeated changing of its height is not necessary. |
||||