Custom Search
|
|
  |
|
|
LRU-13/A LIFE RAFT ASSEMBLY The LRU-13/A life raft assembly consists of an inflation assembly (carbon dioxide cylinder and inflation valve) and a sevenman raft. Two types of carbon dioxide cylinders and four types of inflation valves are approved for service use. The life raft is made up of a two-compartment main tube; an inflatable seat attached to the main tube; a noninflatable floor attached to the bottom of the main tube and inflatable seat; and a sea anchor, which is used to retard drifting. A lifeline, a righting line, a supply pocket, and a combination supply bag and bailer are attached to the main tube. Boarding and righting handles are attached to the main tube and the floor. Emergency survival equipment and raft accessories are stowed in the accessory containers. The lifeline also provides a means for securing the accessory containers to the life raft. Topping-off valves are located on the main tube and the main seat. The LRU-13/A life raft assembly and parts nomenclature are the same as the LRU-12/A (shown in figure 6-2), except that the LRU-13/A is longer. EQUIPMENT AND SURVIVAL ITEMS The LRU-13/A life raft equipment and survival item requirements and the applicable storage container are listed in table 6-5. PACKING PROCEDURES REMOTE OR LOCAL PULL Prior to packing the LRU-13/A life raft assembly, it must be updated by comparing the configuration of the assembly with the modifications listed in NAVAIR 13-1-6.1. The LRU-13/A life raft assembly may be packed for droppable inflation, or for installation into the aircraft nacelle or raft compartment. The method used for packing depends upon the aircraft application. NOTE: The inflation cable housing must not be inserted through the abrasion patch sleeve when folding and packing the raft. The cable housing should be inserted into the sleeve after the raft is inflated. Here are the packing procedures for the LRU-13/A life raft assembly. These packing procedures apply to all methods of packing unless a specific method for either the droppable or local mode of inflation is specified in parentheses. 1. Ensure that the raft, carrying case, and accessory container have been inspected. 2. Ensure that the survival items and raft accessories have been inspected for expiration and damage. Refer to table 6-5 for items used. 3. Wrap all sharp or pointed metallic accessories and survival items with rubber-coated cloth, and secure the objects with rubber bands. Stow the accessories and survival items in the accessory container, or the supplies and bailer pocket, as applicable. 4. Cover the inflation valve with several layers of rubber-coated cloth, and secure it with clothbased, pressure-sensitive tape. Take the webbing retaining line, righting line, and sea anchor mooring line and secure them with rubber bands. Ensure that all of the topping-off valves are closed and the raft is completely deflated. 5. Using a 10-foot length of type III nylon cord, tie the accessory equipment container to the nearest lifeline loop located next to the C O2 cylinder, and stow the container inside the raft.
Table 6-5.-Life Raft Survival Item Requirements and Item Storage Containers for LRU-12/A, LRU-13/A, LRU-14 Series. and LRU-15/A Life Rafts
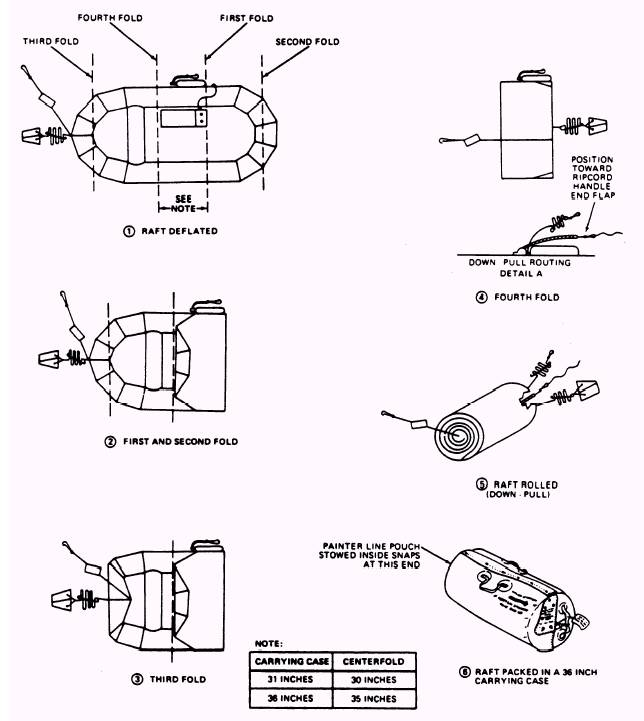
Figure 6-3.-LRU-l3/A raft-folding procedures (droppable). 6. (Fold the raft in accordance with figure 6-3, for droppable inflation). 7. Insert the folded raft into the carrying case so that the actuating handle or pull cable housing is positioned under the carrying case end flap. 8. Secure the carrying case snap fasteners. NOTE: If the actuator case snap hook is not soldered, wrap tape around the hook to prevent possible loss of the spring latch. 9. Rig the pull cable housing to the carrying case ripcord. 10. (Install the ripcord and safety tie the first and last ripcord pins by passing a 12-inch length of size E nylon thread under the ripcord pin). Secure the thread to the ripcord cable with three or four half-hitches (fig. 6-4). NOTE: Rafts stowed inboard on aircraft are secured to the aircraft with a painter line. The painter line is a 60-foot length of cotton cord (unless otherwise specified by the applicable aircraft MIM), type I, size 4, with a 50- to 150-pound static breaking strength. The painter line retains the deployed raft to the aircraft, but will easily break if the aircraft sinks. The painter line is attached to the sea anchor mooring patch loop unless otherwise specified by the applicable aircraft MIM. Stow the painter in the painter line pouch, and place the pouch under the packed raft if possible.
Figure 6-4.-Safety tying ripcord. 11. (Snap the ripcord protector flap closed, position the ripcord handle under the carrying case end flap, and snap the end flap closed). 12. (Ensure that the inflation valve actuating handle is positioned outside the carrying case end flap, and snap the end flap closed). When the LRU-13/A life raft assembly is packed for installation into the aircraft nacelle or raft compartment, follow procedures outlined in the applicable aircraft MIM. All LRU-13/A life raft assemblies installed in C-1 aircraft must be packed for downpull inflation using the "snap hook" remote actuator assembly, which consists of a snap hook pull cable assembly and a pull cable housing assembly. In no instance should "ice-tong" remote actuator assemblies be used in C-1 aircraft. |
 
|