Custom Search
|
|
  |
|
|
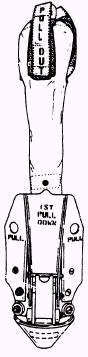
FOREST PENETRATOR AND FLOTATION COLLAR The forest penetrator is bright yellow for high visibility, and is a compact device weighing about 21 1/2 pounds. The forest penetrator is 34 inches long and 8 1/8 inches in diameter with the three seats retracted, and 26 inches in diameter with the seats extended. Each seat is 4 3/4 inches wide, 11 1/2 inches long, and is spring-loaded in the retracted position (flush against the shaft of the penetrator). A spring-loaded retaining latch is provided under each seat to secure the seat in the extended position. To release the seat, push down on the seat and pull down on the latch. The seat then snaps back into the retracted position. Three webbing safety straps are provided to hold the survivors in place. Each strap extends 4 feet 9 1/4 inches, with an adjustable quick-ejector hook attached to the upper section of the penetrator. The straps terminate with a yellow fabric, marked TIGHTEN. Yellow webbing tabs (with hook tape) marked PULL OUT are sewn to the safety straps for attachment to fabric cover stowage openings. The yellow fabric cover has a 17-inch slide fastener and three stowage openings (with pile tape for securing safety straps). (See figure 5-16.)
Figure 5-16.-Forest penetrator.
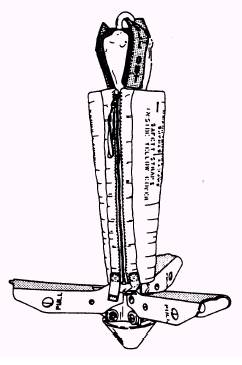
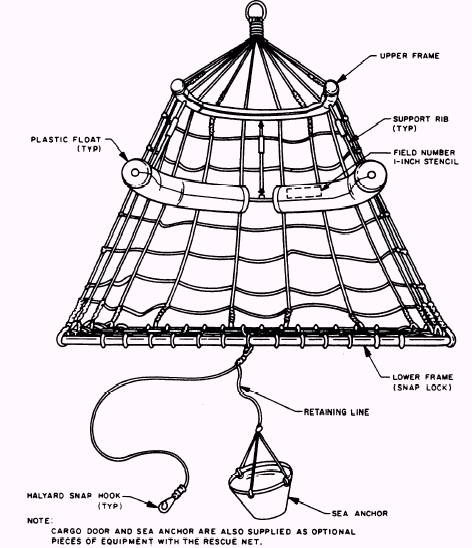
Figure 5-17.-Flotation collar installed on forest penetrator. The flotation collar is made of bright orange foam rubber for high visibility and weighs about 1 1/2 pounds. (See figure 5-17.) It is 2 1/4 inches long, with a 7 3/4-inch diameter at the top and a 4-inch diameter at the bottom. When the flotation collar is installed on the forest penetrator, the retracted diameter at the penetrator is 9 inches. The forest penetrator and flotation collar are intended to assist the rescue swimmer to perform rescue operations in the water or to rescue survivors on land. The flotation collar is a device that, when fastened around the forest penetrator, allows flotation of the complete assembly during air-sea rescue operations. During land rescue operations, the forest penetrator is lowered to the survivor with the seats retracted. For sea operations the forest penetrator is lowered to the rescue swimmer and survivor with the flotation collar installed, safety straps hanging free, and the seats retracted. In this configuration, the penetrator will float its top about 6 inches above the surface of the water. The forest penetrator is designed to accommodate one, two, or three survivors at the same time. Maintenance The aircrewman's responsibility for maintenance of the forest penetrator is limited to washing with fresh water. Repairs or other actions are performed by organizational-level maintenance or above. Inspection All forest penetrators receive a calendar inspection upon issue and at intervals not to exceed 225 days. The calendar inspection consists of visually inspecting both the forest penetrator and flotation collar. When inspecting the condition of the forest penetrator and flotation collar, examine the following: 1. All fabrics for cuts, tears, deterioration, and abrasion. 2. Seams for proper stitching. 3. Straps for security of attachment and wear. 4. Any other parts for wear, damage, and security of attachment. 5. All hardware for security of attachment, corrosion, damage, wear, and, if applicable, ease of operation. 6. The cover for strains, dirt, and general condition. 7. The slide fastener for damage, corrosion, and ease of operation. 8. Compare markings on the forest penetrator and flotation collar to markings listed on the applicable tables in NAVAIR 13-1-6.5. Restore any faded markings, and correct markings, if necessary, with indelible ink. Cleaning The forest penetrator and flotation collar must be cleaned after every immersion in salt water as follows: 1. Wash the penetrator and collar with a mild soap and water solution. Rinse well with fresh water. 2. Wipe the penetrator and collar with clean, lint-free cloth and allow to dry. 3. If necessary, apply silicone lubricant to slide fasteners on the cover of the penetrator to ensure ease of operation. 4. Apply a lubricating oil to all pivot points of the penetrator. Wipe off excessive lubricating oil. 5. Return both assemblies to service. RESCUE NET The rescue net looks like a conically shaped birdcage with an opening on one side. The net weighs approximately 20 pounds and is bright yellow for high visibility. To stabilize the net during use, a sea anchor is provided. A 10-foot sea anchor retaining line with two single snap hooks is also provided. One halyard snap hook permits complete removal of the sea anchor from the net, while the other snap hook permits shortening of the sea anchor to 5 feet to be used in moderate seas. During high seas, the 10-foot retainer line is used. The rescue net has a snap lock lower frame and three upper support ribs with sliding sleeves that form a rigid cage when the net is fully extended. Foam plastic floats are provided on the rigid upper frame of the net. (See figure 5-18.)
Figure 5-18.-Rescue net, parts nomenclature. The rescue net is used to assist the rescue swimmer performing rescue work from a helicopter over water or land. The rescue net may also be used to ferry or pick up cargo. WARNING THE SEA ANCHOR MUST NOT BE USED WHEN HOISTING PERSONNEL OUT OF THE WATER. Maintenance The aircrewman's responsibility for maintenance of the rescue net is limited to a freshwater wash after use. Repairs or other actions required are performed by organizational-level maintenance or above. Inspection All rescue nets are given a calendar inspection upon issue and at intervals of 225 days. The calendar inspection for the rescue net consists of the following visual inspection: 1. Erect the net by unfolding its lower frame assembly and forcing the assembly down. The frame will snap open. 2. Suspend the open section of the net and slide sleeves or the upper support ribs between the swivel joints. The sleeves rest on the support rib stops. 3. Inspect all hardware for security of attachment, corrosion, damage, wear, and ease of operation. Cleaning To clean the rescue net, proceed as follows: 1. Wash the rescue net with a mild soap and water solution. Rinse well with fresh water. 2. Allow the net to air dry. |
 |