|
||
|
|
||
| |||||||||||||||
|
|
PIPE CUTTING Cutting pipe is not much different than cutting structural shapes, except that you must always keep in mind that the cut will either be radial or miter. The gas cutting torch is used to cut pipe fittings for welding. Procedures relating to the use of the cutting torch are given in volume 1, chapter 4. The torch maybe hand operated, or it maybe mounted on a mechanical device for more accurate control. Cutting machines may be used to prepare many fittings without the use of templates. These machines cut and bevel the pipe in one operation-the bevel extending for the full pipe wall thickness. When the pipe is cut by hand, beveling is done as a second operation. For many types of welded fittings, a RADIAL cut is required before beveling. Radial cutting simply means that the cutting torch is held so it is perpendicular to the interior center line at all times. In other words, the cutting orifice always forms a continuation of a radius of the pipe, making the cut edge square with the pipe wall at every point. Figure 3-59 shows radial cutting. Except in the case of the blunt bull plug, for which the radial cut provides the proper vee, the radial cut should be followed by a beveling cut for pipe with 3/1 6 inch (4.8 mm) or more wall thickness. In MITER cutting the torch tip is held so that the entire cut surface is in the same plane. The miter cut is followed by a beveling cut, leaving a 1/32- to 1/16-inch (.8 to 1.6-mm) nose at the inner wall. Figure 3-60 shows miter cutting.
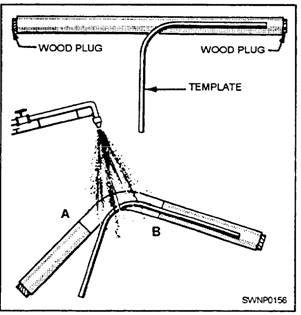
Figure 3-60.-Miter cutting. PIPE BENDING Any piping system of consequence will have bends in it. When fabricating pipe for such a system, you can make bends by a variety of methods, either hot or cold, and either manual] y or on a power-bending machine. Cold bends in pipe are usually made on a bending machine. Various types of equipment are available, ranging from portable handsets to large hydraulically driven machines that can cold bend pipe up to 16 inches (40.64 cm) in diameter. You will be concerned primarily with hot bending techniques, using a bending slab or using a method known as wrinkle bending. TEMPLATES Whatever method you use to bend pipe, you should normally have some pattern that represents the desired shape of the bend. Templates made from wire or small, flexible tubing can be invaluable in preparing new installations as well as in repair work, When properly made, they will provide an exact guide to the bend desired. One of the simple types of bend template is the center line template. A centerline template is made to
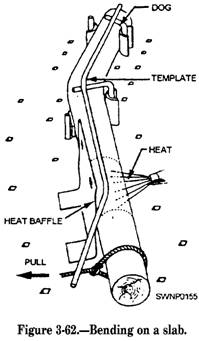
Figure 3-59.-Radial cutting. conform to the bend or bends of the pipe to be made. It is used to lay off the bend area on the pipe and as a guide during the pipe or tube bending operation. Figure 3-61 shows the use of a center line template. These templates are made of wire, or rod, and are shaped to establish the center line of the pipe to be installed. The ends of the wire are secured to special clamps, called flange spiders. A clearance disc, which must be the same diameter as the pipe, is used if there is any doubt about the clearance around the pipe. HOT BENDS Hot bends are accomplished on a bending slab (fig. 3-62). This slab requires little maintenance beyond a light coating of machine oil to keep rust in check. As a preliminary step in hot bending, pack the pipe with dry sand to prevent the heel or outside of the bend from flattening. If flattening occurs, it will reduce the
cross-sectional area of the pipe and restrict the flow of fluid through the system. Drive a tapered, wooden plug into one end of the pipe. Place the pipe in a vertical position with the plugged end down, and fill it with dry sand. Leave just enough space at the upper end to take a second plug. To ensure that the sand is tightly packed, tap the pipe continually with a wooden or rawhide mallet during the filling operation. The second plug is identical with the first, except that a small vent hole is drilled through its length; this vent permits the escape of any gases (mostly steam) that may form in the packed pipe when heat is applied. No matter how dry the sand may appear, there is always a possibility that some moisture is present. This moisture will form steam that will expand and build up pressure in the heated pipe unless some means of escape is provided. If you do not provide a vent, you will almost certainly blow out one of the plugs before you get the pipe bent. When you have packed the pipe with sand, the next step is to heat the pipe and make the bend. Mark the bend area of the pipe with chalk or soapstone, and heat it to an even red heat along the distance indicated from A to B in figure 3-63. Apply heat to the bend area frost on the outside of the bend and then on the inside. When an even heat has been obtained, bend the pipe to conform to the wire template. The template is also used to mark the bend area-on the pipe.
Figure 3-63.-Heating and bending pipe to conform to wire template. The main problem you will have in bending copper tubing and pipe is preventing wrinkles and flat spots. Wrinkles are caused by compression of the pipe wall at the throat (inside) of the bend. Flat spots are caused by lack of support for the pipe wall, by stretch in the heel (outside) of the bend, or by improper heating. If the pipe is properly packed and properl y heated, wrinkles and flat spots can be prevented by bending the pipe in segments so that the stretch is spread evenly over the whole bend area. When a pipe is bent, the stretch tends to occur at the middle of the bend. If the bend area is divided into a number of segments and then bent in segments, the stretch will occur at the center of each segment and thus be spread more evenly over the bend area. Another advantage of bending in segments is that this is almost the only way you can follow a wire template accurately. When bending steel and some other piping materials, you can control wrinkles and flat spots by first overbending, the pipe slightly and then pulling the end back (fig. 3-64). Hot bends are made on a bending slab (fig. 3-64). The pull to make the bend is exerted in a direction parallel to the surface of, the bending slab. The necessary leverage for forming the bend is obtained by using chain falls, by using block and tackle, or by using a length of pipe that has a large enough diameter to slip over the end of the packed pipe. Bending pins and hold-down clamps (dogs) are used to position the bend at the desired location. Be sure to wear asbestos gloves when working on hot bending jobs. Pins, clamps, and baffles often have to be moved during the bending operation. These items absorb heat radiated from the pipe as well as from the torch flame. You cannot safely handle these bending accessories without proper gloves. Each material has its peculiar traits, and you will need to know about these traits to get satisfactory
Figure 3-64.-Overbending to correct flattening of pipe. results. The following hints for bending different materials should prove helpful: WROUGHT IRON-Wrought iron becomes brittle when hot, so always use a large bend radius. Apply the torch to the throat of the bend instead of to the heel. BRASS-Do not overbend, as brass is likely to break when the bend direction is reversed. COPPER-Hot bends may be made in copper, although the copper alloys are more adaptable to cold bending. This material is one that is not likely to give any trouble. ALUMINUM-Overbending and reverse bending do not harm aluminum, but because there is only a small range between the bending and melting temperature, you will have to work with care. Keep the heat in the throat at all times. You will not be able to see any heat color, so you must depend on "feel" to tell you when the heat is right for bending. You can do this by keeping a strain on the pipe while the bend area is being heated. As soon as the bend starts, flick the flame away from the area. Play it back and forth to maintain the bending temperature and to avoid overheating. CARBON-MOLYBDENUM and CHROMIUMMOLYBDENUM-These maybe heated for bending, if necessary, but caution must be exercised so as not to overheat the bend area. These types of metal are easily crystallized when extreme heat is applied. Pipes made from these materials should be bend cold in manual or power-bending machines. |
|
Privacy Statement - Press Release - Copyright Information. - Contact Us - Support Integrated Publishing |