|
||
|
|
||
| |||||||||||||||
|
|
OVERHEAD-POSITION WELDING Overhead welding is the most difficult position in welding. Not only do you have to contend with the force of gravity but the majority of the time you also have to assume an awkward stance. Nevertheless, with practice it is possible to make welds equal to those made in the other positions. Current Settings and Electrode Movement To retain complete control of the molten puddle, use a very short arc and reduce the amperage as recommended. As in the vertical position of welding, gravity causes the molten metal to drop or sag from the plate. When too long an arc is held, the transfer of metal from the electrode to the base metal becomes increasingly difficult, and the chances of large globules of molten metal dropping from the electrode increase. When you routinely shorten and lengthen the arc, the dropping of molten metal can be prevented; however, you will defeat your purpose should you carry too large a pool of molten metal in the weld. One of the problems encountered in overhead welding is the weight of the cable. To reduce arm and wrist fatigue, drape the cable over your shoulder when welding in the standing position. When sitting, place the
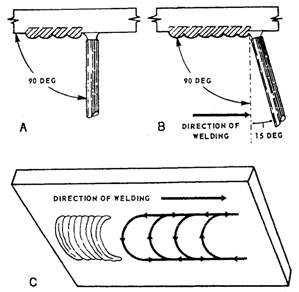
Figure 7-39.-Position of electrode and weave motion in the overhead position.
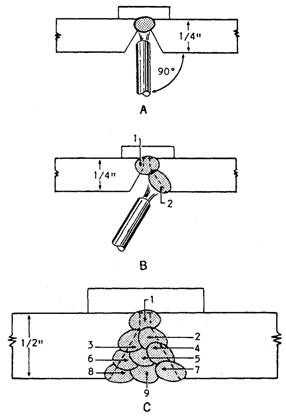
Figure 7-40.-Multipass butt joint in the overhead position. cable over your knee. With experience, cable placement will become second nature. WARNING Because of the possibility of falling molten metal, use a protective garment that has a tight fitting collar that buttons or zips up to the neck. Roll down your sleeves and wear a cap and appropriate shoes. Type of Welds Techniques used in making bead welds, butt joints, and fillet welds in the overhead position are discussed in the following paragraphs. BEAD WELDS.-For bead welds, the work angle of the electrode is 90 degrees to the base metal (fig. 7-39, view A). The travel angle should be 10 to 15 degrees in the direction of welding (fig. 7-39, view B). Weave beads can be made by using the motion shown in figure 7-39, view C. A rather rapid motion is necessary at the end of each semicircular weave to control the molten metal deposit. Avoid excessive weaving because this can cause overheating of the weld deposit and the formation of a large, uncontrollable pool. BUTT JOINTS.- Prepare the plates for overhead butt welding in the same manner as required for the flat position. The best results are obtained when backing strips are used; however, you must remember that you will not always be able to use a backing strip. When you bevel the plates with a featheredge and do not use a backing strip, the weld will repeatedly burn through unless extreme care is taken by the operator. For overhead butt welding, bead welds are preferred over weave welds. Clean each bead and chip out the rough areas before placing the next pass. The electrode position and the order of deposition of the weld beads when welding on 1/4- or 1/2-inch plate are shown in figure 7-40, views B and C. Make the first pass with the electrode held at 90 degrees to the plate, as shown in figure 7-40, view A. When you use an electrode that is too large, you can not hold a short arc in the root area. This results in insufficient root penetration and inferior joints. FILLET WELDS.- In making fillet welds in either tee or lap joints in the overhead position, maintain a short arc and refrain from weaving of the electrode.
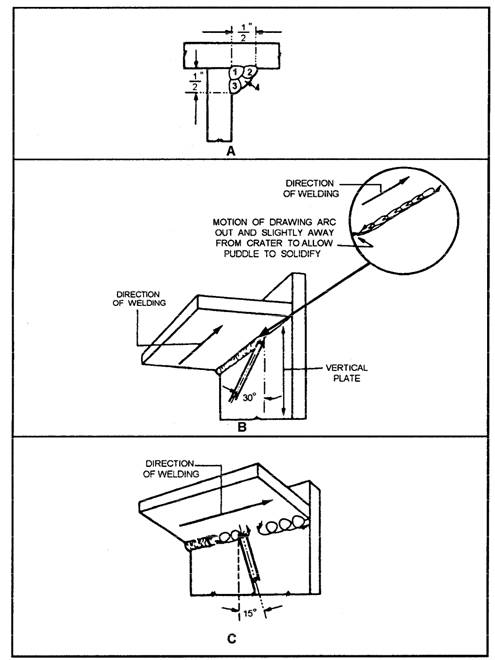
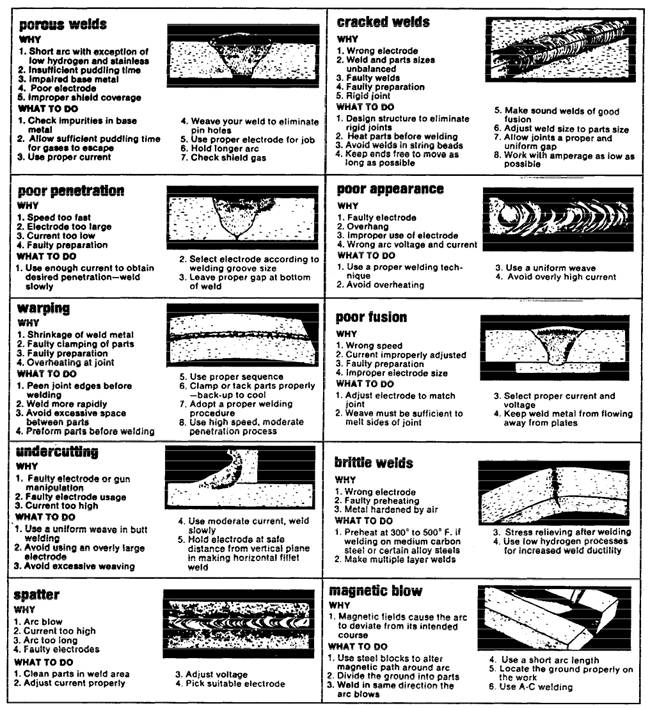
Figure 7-41.-Fillet welding in the overhead position. Hold the electrode at approximately 30 degrees to the vertical plate and move it uniformly in the direction of welding, as shown in figure 7-41, view B. Control the arc motion to secure good penetration in the root of the weld and good fusion with the sidewalls of the vertical and horizontal plates. When the molten metal becomes too fluid and tends to sag, whip the electrode quickly away from the crater and ahead of the weld to lengthen the arc and allow the metal to solidify. Immediately return the electrode to the crater and continue welding. Overhead fillet welds for either tee or lap joints on heavy plate require several passes or beads to complete the joint. One example of an order of bead deposition is shown in figure 7-41, view A. The root pass is a string bead made with no weaving motion of the electrode. Tilt the electrode about 15 degrees in the direction of welding, as shown in figure 7-41, view C, and with a Table 7-3-Causes and Cures of Common Welding Problems
slight circular motion make the second, third, and fourth passes. This motion of the electrode permits greater control and better distribution of the weld metal. Remove all slag and oxides from the surface of each pass by chipping or wire brushing before applying additional beads to the joint. |
|
Privacy Statement - Press Release - Copyright Information. - Contact Us - Support Integrated Publishing |