Custom Search
|
|
  |
|
|
PREINSULATED SPLICES
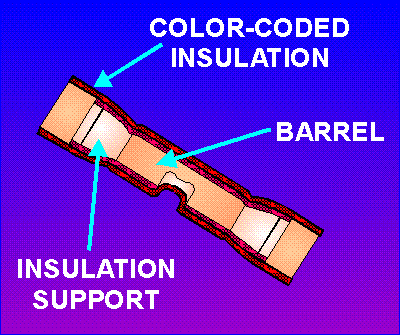
Preinsulated permanent copper splices are used to join small copper wire AWG sizes No. 26 through No. 10. A typical splice is shown in figure 2-23. Note that the splice preinsulation extends over the wire insulation. Each splice size can be used for more than one wire size. Splices are color coded in the same manner as preinsulated small copper terminal lugs (see table 2-2). Figure 2-23. - Preinsulated copper splice.
Crimping Procedure for Splices. Crimping small preinsulated copper splices in the No. 26 to No. 14 wire-size range can be accomplished with several recommended tools. In this section, we will discuss the basic crimping procedures.
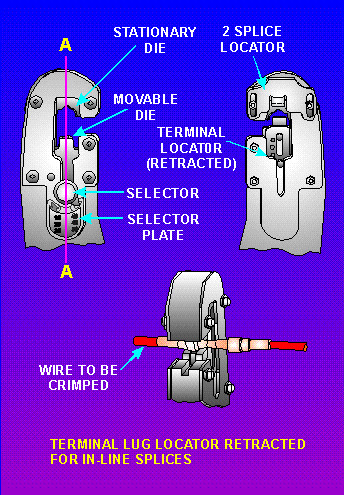
With the tool handles fully open, set the wire size selector knob to the proper position for the wire size being crimped. Slide the terminal lug locator down below the die surface into the fully retracted position. (See figure 2-24.) Slide the splice locator back into the retracted position. Insert the splice into the tool so that the "locating shoulder" on the side of the splice to be crimped is in the space between the two crimping dies. The insulation barrel on this side of the splice should protrude from the "wire side" of the tool. (See figure 2-24.) Slide the splice locator into the fully extended position. Insert the splice into the stationary die so that the locator "finger" fits into the locator groove in the splice.
Figure 2-24. - Locating splice in crimping tool.
If the correct tools are used and the proper procedures followed, crimp-on connections are more effective electrically, as well as mechanically, than soldered connections. A visual inspection is very important. It reveals oxidation, deterioration, overheating, and broken conductors. In some cases it may be necessary to check these connections with an ohmmeter. The proper resistance, for all practical purposes, should be zero. Any defective terminal should be removed and a new terminal crimped on. Q.18 What is the most common method of terminating and splicing wires? |
 
|
|
|
Integrated Publishing, Inc. - A (SDVOSB) Service Disabled Veteran Owned Small Business
|