Share on Google+Share on FacebookShare on LinkedInShare on TwitterShare on DiggShare on Stumble Upon
Custom Search


NONINSULATED TERMINAL AND SPLICE INSULATION

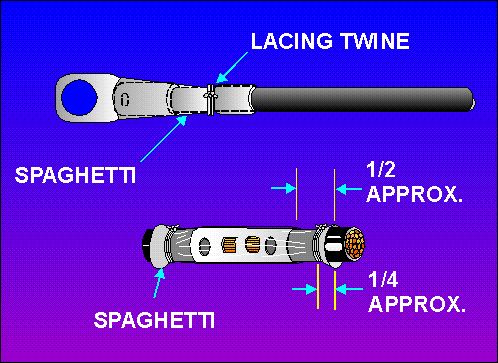
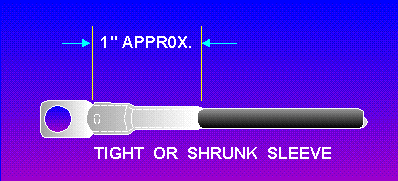
When noninsulated terminals and splices are used, some form of insulation must be used to cover the bare conductor. The two most common forms of insulator used for terminals and splices are transparent tubing (commonly called spaghetti) and heat-shrinkable tubing. If spaghetti is used, it must be tied with lacing twine, as illustrated in figure 2-13. Heat-shrinkable tubing is shrunk to the desirable size by applying dry heat. It is also a good way to insulate terminals and splices, as illustrated in figure 2-14. This tubing shrinks to approximately one-half its original diameter when heated with an electrical hot-air gun (figure 2-15). Here are the steps for using the hot-air gun:

Figure 2-13. - Spaghetti tied with lacing twine.

32NE0342.GIF (20450 bytes)

Figure 2-14. - Shrunken sleeve.

32NE0343.GIF (10233 bytes)

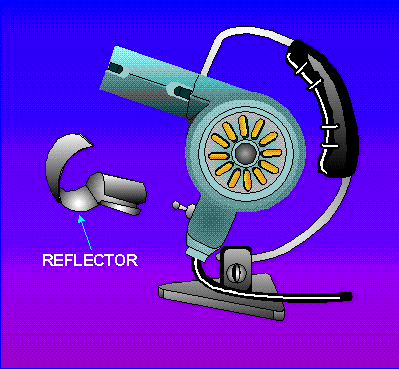
Figure 2-15. - Typical hot-air gun.

32NE0344.GIF (22148 bytes)

Hold the heat source 4 to 5 inches away from the wire. Apply a heat of 275F to 300F for about 30 seconds. Rotate the wire while applying the heat so that the heat is evenly distributed.

  • Remove the heat as soon as the tubing conforms to the shape of the wire.
  • Allow the tubing to cool for at least 30 seconds before handling.

Do not apply heat higher than 300F as this may damage the wire. Do not continue to apply heat after the tubing has shrunk onto the wire. Further application of heat will not cause additional shrinkage of the tubing.

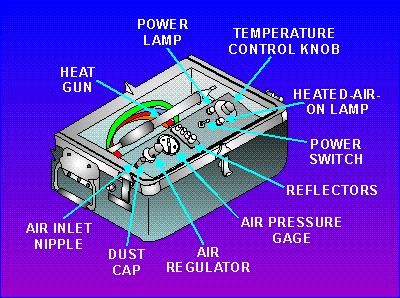
COMPRESSED AIR/NITROGEN HEATING TOOL

The compressed air/nitrogen heating tool (figure 2-16) is a new tool in the fleet and was designed as a portable source of heat. This tool is safe for use around fueled aircraft because an open heating element is not required. The compressed air/nitrogen heating tool can be used on heat-shrinkable tubing.

Figure 2-16. - Compressed air/nitrogen heating tool.

32NE0345.GIF (21618 bytes)

The compressed air/nitrogen heating tool comes in two styles: ac or dc electrical power supplies. The power requirements are listed in table 2-1 for both styles.

Table 2-1. - Compressed Air/Nitrogen Heating Tool Power Requirements

Electrical Power, HT-900B 115 VAC, 50-400 Hz, single-phase, 7 Amps
Electrical Power, HT-920B 220 VAC, 50-400 Hz, single-phase, 3.5 Amps
Heat gun output temperature 550-920F (290-495C)
Compressed air/nitrogen 80-200 psig, 4 SCFM (Dry and oil-free)

Refer to the operator's manual for safe operating procedures for the compressed air/nitrogen heating tool. A brief summary of these procedures follows:

Push down and fully turn the air regulator knob counterclockwise. This is to ensure that the air regulator is off. Remove the dust cap from the air inlet nipple. The inlet nipple is what we connect the air or nitrogen source line to.

If nitrogen is used, make sure that you are in a well-ventilateed area. Using nitrogen is a poorly ventilated area. Using nitrogen is a poorly ventilated area can result in suffocation.

As noted in table 2-1, the compressed air/nitrogen source CANNOT be greater than 200 psig.

  • Attach the air/nitrogen hose to the inlet nipple, making sure there is a firm connection.
  • Once the air/nitrogen source is properly attached, push down and turn the air regulator knob clockwise until the pressure on the air pressure gauge indicates between 5 to 7 psig.
  • Plug in the power cord to an appropriate grounded power supply.

Set the power switch to the ON position. The power lamp and heated-air-on lamp will both illuminate. (If the lights do not come on, check the switch on the gun handle. The switch must be positioned toward the front of the handle.) There is a 1-minute warm-up time. During this warm-up period, ensure that the indicated air pressure increases to 10 to 15 psig on the air-pressure gauge. You can now adjust the temperature control knob to the desired temperature setting. You can turn the air/nitrogen pressure off and on to the gun without powering down the module by using the switch mounted on the gun handle.

After you complete your task with the compressed air/nitrogen heating tool, use the following shutdown procedures:

  • Push down and fully turn the air regulator knob counterclockwise. Observe that the air pressure gauge indication drops to 0 psig and the heated air lamp goes out.
  • Position the switch on the heating gun toward the rear of the handle.
  • Place the power switch to the OFF position and observe that the power lamp goes out.
  • Allow the air/nitrogen to flow for a minimum of 1 minute to cool the heating gun. (This procedure is done to extend the life of the heating element.)
  • Disconnect the power connecter from the power source.
  • Turn off air/nitrogen source at place of origin and disconnect.
  • Disconnect the compressed air/nitrogen hose from the air inlet nipple and install the dust cap on the air inlet nipple.

Noninsulated Copper Terminals

The procedure for crimping a copper terminal (noninsulated) to a copper wire is as follows:

  • With a wire stripper, trim the insulation from the wire about one thirty-second of an inch longer than the length of the terminal barrel. When using a wire stripper, be sure to use the correct size stripping slot for the wire size used. Otherwise, all the insulation will not be removed or, if the slot is too small, the outside strands of the conductor will be nicked and consequently weakened. When a knife is used for stripping wire, care should be used to prevent nicking the strands. Slip the spaghetti or heat-shrinkable tubing over the wire and back far enough to be out of the way of the crimping operation.
  • Slip the terminal barrel over the bared wire end and up against the insulation. Make certain that all wire strands are inside the tubular barrel of the terminal.
  • Center the terminal barrel in the female nest of the plier jaws as shown in figure 2-12 so that the indentation formed by the staking die will be in the center of the barrel. Crimp until the pliers reach their stop or limit. This is necessary for a good mechanical and electrical connection.
  • Slip the tubular insulation down over the terminal barrel so that it extends a little beyond the barrel. Tie it in place if spaghetti is used.
  • If heat-shrinkable tubing is used, shrink with a heat gun.

Q.11 What is a major advantage of the crimped terminal over the soldered terminal? answer.gif (214 bytes)
Q.12 What are the two types of insulation most commonly used for noninsulated splices and terminal lugs? answer.gif (214 bytes)
Q.13 What is the maximum allowable temperature that should be used on heat-shrinkable tubing? answer.gif (214 bytes)
Q.14 What is the maximum allowable source pressure that can be used with the compressor air/nitrogen heating tool? answer.gif (214 bytes)


Western Governors University


Privacy Statement - Copyright Information. - Contact Us

Integrated Publishing, Inc. - A (SDVOSB) Service Disabled Veteran Owned Small Business