| Tweet |

Custom Search
|
|
 
|
||
|
TIRE REPAIR Facilities for repairing tires vary from one location to another. Some deployment locations have poweroperated tire repair equipment to support tire repair. This
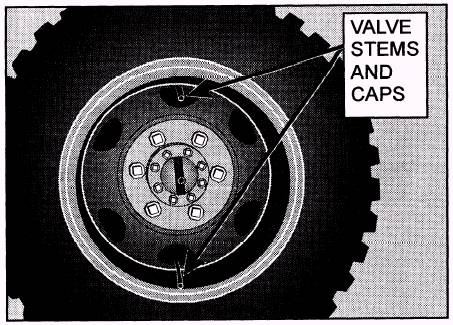
Figure 3-27.-180-degree valve stem location.
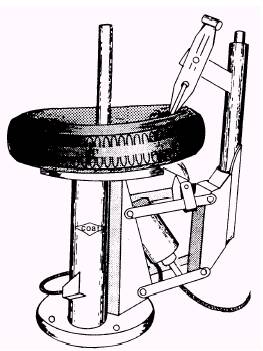
Figure 3-28.-Pneumatic tire demounter.
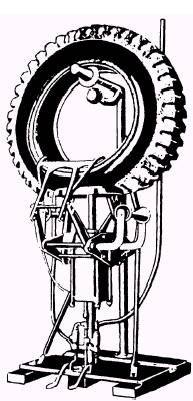
Figure 3-29.-Pneumatic tire spreader.
Figure 3-30.-Inflation safety cage. equipment is similar to those shown in figures 3-28 and 3-29. The first step in tire changing is to remove the valve core and deflate the tire completely. When using any tire repair equipment, install the tire and rim by closely following the manufacturer's instructions. The pneumatic tire demounter holds the wheel and tire still while it breaks the tire bead loose from the wheel rim. An adapter is used to remove the tire from or replace it on the rim. Tire demounters are manual, hydraulic, or air-operated. The one shown in figure 3-28 is an air-operated demounter for automotive and light truck tires. NOTE: All of the related instructions for the use of tire shop equipment must be posted in the tire shop. The spreader (fig. 3-29) separates the tire beads enough to allow close inspection and maintenance on the inside of the tire. When mounting a tire, inflate the tube until it is almost round. Put the inside bead of the tire on the rim and insert the tube into the tire with the valve at the balance mark on the tire. Place the valve stem through the hole and make sure that it is perpendicular to the hole. This step prevents chafing and damage to the valve stem during vehicle operation. When installing the second bead on the rim, start on the opposite side from the valve stem. Place the tire and wheel in an APPROVED SAFETY CAGE (fig. 3-30). After mounting it on the rim, inflate the tire slowly. Make sure the tire beads fit snugly against the rim flanges. You may have to overinflate the tire at first to make the bead seat on the rim. Once seated, allow the tire to deflate and install a new valve core. Then inflate the tire to the recommended pressure. Unless your tire shop is well equipped, machinery for repairing truck tires, such as split rims and rims with removable side rings, may not be available or may not work on the various types of wheels and rims you may
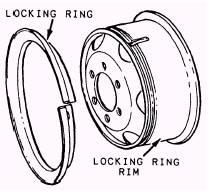
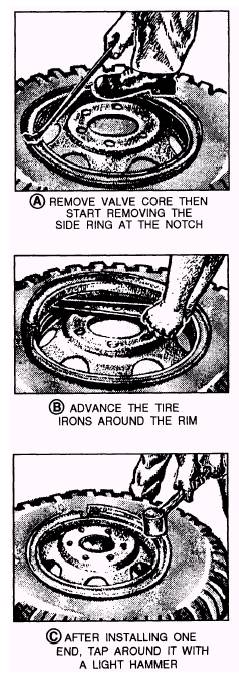
Figure 3-31.-Locking ring rim. have to repair. When repairing tires with locking rings (fig. 3-31), first remove the valve core and deflate the tire. Force the tire bead away from the removable side ring with a slide hammer device intended for this purpose. Next, remove the side ring, as shown in figure 3-32, views A and B. Turn the wheel and tire over and
Figure 3-32.-Demounting and mounting a military truck tire. loosen the other bead. Once the beads are broken, the tire can be removed from the rim by standing the tire on the thread and prying the wheel out of the tire. Ensure the valve stem is not bent or damaged as the wheel is removed. To replace the tire, position the wheel, as shown in figure 3-32, view C. Lower the tire over the rim, and at the same time, make sure the valve stem is passed through the valve hole and points upward. NOTE: The valve stem should always point toward the removable side ring. If there is no side ring, point it toward the disc portion of the wheel. The next step is to center the side ring and force one end into position with your foot. Then the ring can be installed as shown, or the repair person can merely walk around the top of the ring and force it to slide into the locking groove. Inflating a tire mounted on a locking ring rim is dangerous. An improperly seated lock ring may blow off, causing serious injury to you or any other person in its path. A sprung ring, or one which is bent or twisted, may be difficult to install and, if used, is a safety hazard and should be replaced. Before applying air pressure to this tire, be sure that the locking ring is seated against the rim of the wheel through its entire circumference. If the lock ring does not seat properly, inflate it to 5 to 10 pounds, then tap the locking ring carefully with a mallet. NEVER STAND IN FRONT OF OR OVER THE LOCKING RING. ADDITIONALLY, REMEMBER TO USE THE SAFETY CAGE FOR INFLATION. When you have to inflate a tire that is already mounted, use a snap-on chuck which is an air hose that snaps onto the valve stem. This allows you to stand to one side of the tire. Make it a professional practice to never stand in front of a tire being inflated. |
 
|
|
|
||