Custom Search
|
|
 
|
||
|
Maintenance To allow proper operation of a temperature regulator, the valve stem must not bind in the stuffing box, but must move freely. The valve stem must be lubricated frequently where it enters the stuffing box and also around the threaded sleeve used for the manual control. A small amount of grease should also be used on the bevel
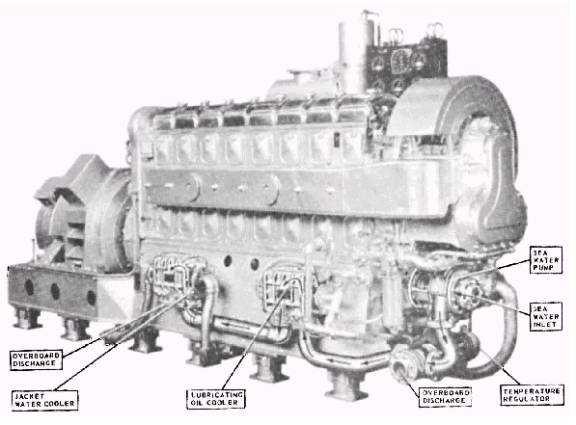
Figure 3-8.Location of coolers and other cooling system components of GM 8-268A engines. gears. The valve packing nut should be kept only finger tight and should be lubricated occasionally with a drop of oil. Should it become necessary to renew the packing, you will need to remove the nut, take out the packing gland, clean the stuff-ing box, and repack it with asbestos wicking saturated with oil. Should the temperature of the freshwater leaving the engine be too high when the regulator is set on the lowest adjustment setting you should do the following: 1. Ensure that the manual pointer is set at the THERMOSTATIC position. 2. Ensure that the packing gland is not binding the valve stem and that the valve stem is not stuck in the COOLER CLOSED (minimum cooling) position. 3. Check the water lines for other causes of the difficulty. If this check does not reveal the cause of the trouble, it is probable that the temperature control element is inoperative, and that it should be checked. If undercooling occurs when the temperature regulator is set on the highest adjustment setting, check for a sticking valve in the BY-PASS CLOSED (maximum cooling) position. Sticking may be caused by a tight stuffing box or by dirt under the lower valve seat. If the temperature at the bulb is lower than the set temperature and the valve position indicator shows COOLER CLOSED, excessive leakage is indicated. In such case you will have to regrind the valve using the following procedure: 1. Disconnect the valve from the piping. 2. Remove the packing nut and the packing. 3. Disconnect the valve stem and remove the locknut from the thermostatic stem. 4. Remove the thermostatic control unit from the valve. 5. Clean the valve stem until it is smooth. If necessary, polish it with fine emery cloth. 6. Grind the valve seats until a perfect seal is obtained; then remove all grinding compound from the valve and the seats. 7. Reassemble the valve and the control unit. 8. Repack the stuffing box and lubricate it with engine oil.
Figure 3-9.Bulb installation. 9. Secure the packing gland nut finger tight. 10. Insert the bulb into the ships piping in either a horizontal or vertical position, as shown in views A and B of figure 3-9. When the bulb is installed in the vertical position, the nut must be at the top; when it is installed in the horizon-tal position, the arrow on the indicator disk must point upward. NEVER INSTALL THE BULB WITH THE NUT AT THE BOTTOM (as shown in view C of figure 3-9) because in this position the liquid would be below the end of the internal capillary tube and would have little or no effect on the bellows of the temperature regulator valve. 11. Adjust the regulator. |
 
|
|
|
||