Custom Search
|
|
 
|
||
|
HANDPIECE HOSES.\The handpiece hose is attached to a coupling that joins the handpiece to the hose. Never over-tighten the coupling. Under- tightening
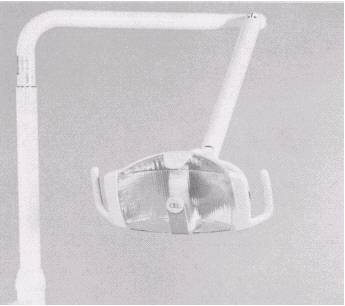
Figure 11-6.\Handpiece controls. can cause air and waterleaks. Many providers use a "quick disconnect" that attaches to the coupling. By gently pulling on the handpiece, the operator is able to change handpieces very quickly. The quick disconnect is also available with a 360 swivel that allows the handpiece to be turned around without tangling up the hoses. Perform a daily operational check on the quick disconnect equipment. Inspect "O" rings and replace them if found frayed or missing. FOOT CONTROL.\All handpieces are operated by the provider through the use of a foot control (rheostat) device. A valve inside the foot control regulates the handpiece speed and provides an air signal that activates the air and water coolant flow. The foot control is operated by light foot pressure applied to any part of the disk. Some foot controls may also be equipped with a wet/dry toggle switch and a chip blower. The wet/dry toggle switch can shut off the water coolant to the handpiece without moving the hands from the treatment area. The chip blower sends a jet of air through the handpiece when not in use to remove any debris accumulated in the treatment site. Other Controls The other controls that could be on the bracket table and assembly, depending on the make and model, are as follows: WATER COOLANT ON/OFF TOGGLE\ Stops the flow of water coolant to all handpieces. AIR COOLANT FLOW CONTROL\Adjusts the air coolant flow to all handpieces and can completely shut off the air coolant. DRIVE AIR PRESSURE CONTROL\Adjusts the drive air pressure to the handpiece with an adjustment screw for each handpiece. SYRINGE FLOW CONTROL\Adjusts the air and water flow from the three-way syringe. AUTOMATIC HANDPIECE HOLDER\ Shuts off air and water to the handpiece when it is in the holder. HANDPIECE TUBING FLUSH SYSTEM\ Some newer models of dental units have a handpiece tubing flush system that quickly and thoroughly flushes the handpieces to wash away contaminants accumulated in the handpiece and tubing. This system saves wear on the handpieces by sending water directly to the handpiece, and bypassing the control block and not requiring the handpiece turbine to operate. Flush the handpieces at the beginning of each day for 1 minute, after each patient, and at the end of the workday for 30 seconds following BUMEDINST 6600.10. THREE-WAY SYRINGES\Each dental unit has at least one 3-way syringe that provides a stream of (1) air, (2) water, or (3) a combination spray of air and water. Many of the new syringes have a quick disconnect that allows the syringe tip to be changed for each patient and is autoclavable. The water temperature control, if equipped, on the dental unit, can be adjusted to keep the temperature of the water at approximately 130F. DENTAL LIGHT The dental light (fig. 11-7) illuminates the patient's mouth and treatment area. It may be on a ceiling track or mounted to the DDS. The light should be properly positioned 30-36 inches from the patient's face. Most dental lights mounted to the DDS consist of three major assemblies: the transformer and rigid arm assembly, flex arm assembly, and the light head assembly. The intensity switch located on the transformer housing is used to set the intensity of the light to low, medium, or high settings. The dental light head rotates on three different axes. It can rotate as much as 180 horizontally, 125 vertically, and 45 diagonally from either side. To perform a daily operational check on the dental light. Turn light on. Move light ensuring a free full range of motion. Light should not drift. If drifting is discovered, initiate a repair request Light Replacement Often, at the most inconvenient time, the bulb in the dental light burns out. To avoid further delays, you need to know how to quickly and properly replace the bulb. Use the following steps to change a bulb: Turn the light switch to the off position and allow the bulb to cool. Release the fastening devices on the light shield and move the shield aside. Use a gauze pad or cloth to protect your fingers when removing the bulb. Very carefully pull the old bulb from the socket and discard it. Most units have a spare bulb compartment on the light assembly. Open the wrapper of the new bulb to expose the bulb pins, but do not remove the bulb from the wrapper. Use the wrapper to protect the bulb #while installing it. This is necessary because finger oils limit bulb life and can affect light performance.
Figure 11-7.\Dental light. If you do touch the bulb by mistake, gently clean it with cotton soaked in ethyl alcohol. Carefully insert the new bulb into the socket and remove the wrapper. CAUTION Never operate the dental light with the light shield removed. The shield is your protection against injury if the bulb shatters. Replace the light shield, and test the dental light to ensure it works properly. Notify the dental repair department to replace the spare light bulb you used, or if the light does not begin to function properly. Light Shield The light shield is constructed of hard plastic and is used to protect the dental light bulb and the reflector. Because the dental light is close to the patient treatment area, it is frequently soiled by splatter and aerosols. Use the following steps to clean the light shield: Ensure the light has cooled before cleaning the light shield. Release the fastening devices on the dental light to remove the light shield. Immerse the shield in warm, soapy water, rinse in clear water, and then wipe dry with a lint-free cloth. When the shield is clean, replace it on the dental light and test for proper operation. Light Reflector The light reflector is constructed of glass and is protected by the light shield. Use the following steps to clean the inside surface of the reflector when dust or spots reduce the efficiency of the light: Allow the light and reflector to cool before removing the light shield. Use a soft, lint-free cloth to gently remove any accumulated dust particles. Unplug the DDS or dental light. Use a dampened cloth with water or a diluted solution of mild dishwashing soap for a more thorough cleaning. Ensure the cloth is not so wet that it drips into the electrical parts of the light. Wipe the inside surface of the reflector in one direction only. Ensure no residue remains on the reflector. Never use abrasives or chlorine on the surface of the reflector. Doing so can damage or discolor the surface of the reflector, causing poor lighting. Do not rub heavily or clean the reflector when it is hot. Never soak the reflector in cleaning solutions. After cleaning is completed, replace the light shield and test for proper operation. |
 
|
|
|
||