

TM 9-2350-222-20-1-4
SHIFT LINKAGE ADJUSTMENT (Sheet 9 of 20)
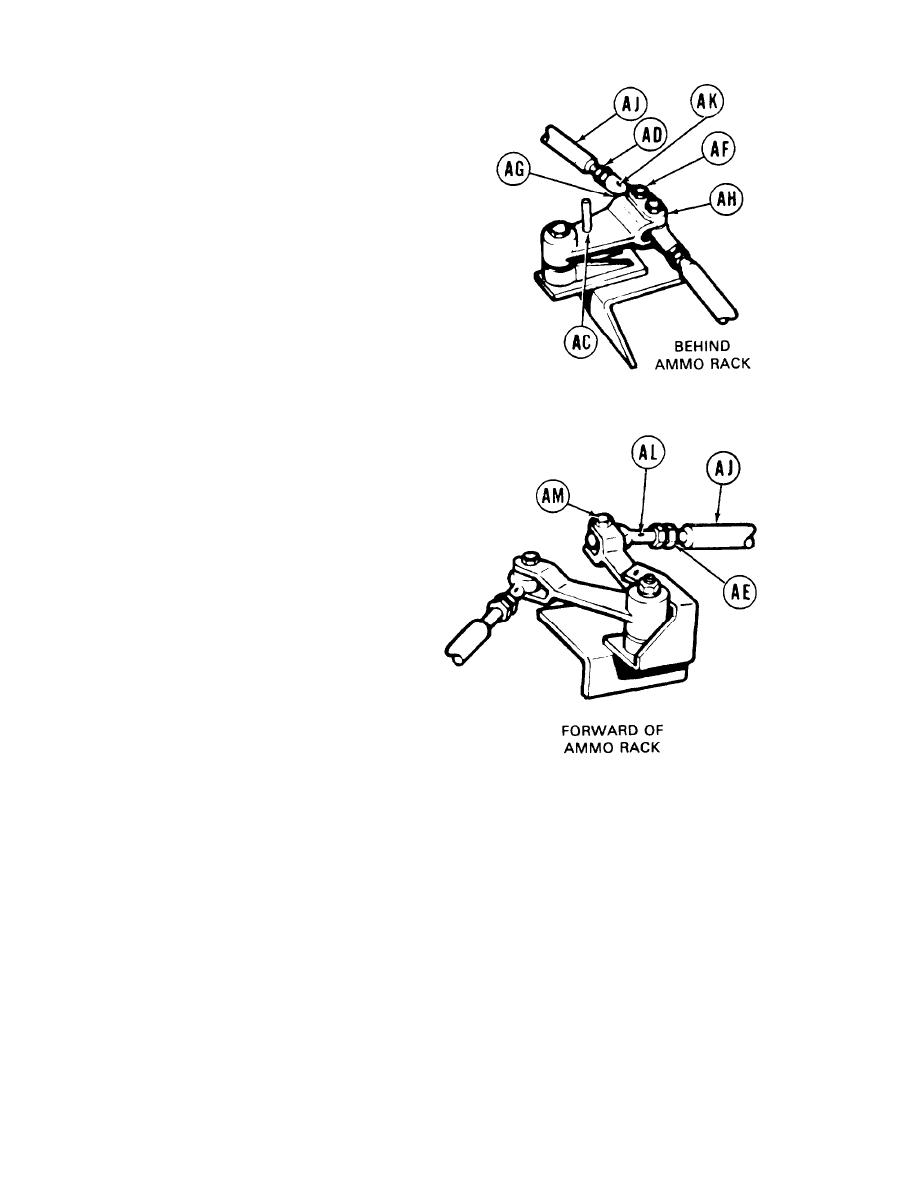
49.
Using 9/16 inch wrench, adjust shifting rod
bearing end (AG) by turning clockwise or
counterclockwise until screw (AF) drops freely
through clevis (AH) and shifting rod bearing
end (AG).,
Using small diameter wire (Item 59, Appendix
50.
D), check to see if shifting rod (AJ) is past
holes (AK) and (AL). If shifting rod (AJ) is
past holes (AK) and (AL), do steps 51 thru 53,
If shifting rod (AJ) is not past hole (AK), do
steps 54 thru 62. If shifting rod (AJ) is not
past hole (AL), go to step 63.
51.
Using 9/16 inch wrench, install screw (AF)
through clevis (AH) and shifting rod bearing
end (AG).
Using crowfoot and torque wrenches, tighten
52.
jamnuts (AD) and (AE) to 15-20 Ib-ft (20-
27 N.m). Remove locating pin from alinement
hole (AC).
Using 9/16 inch socket and torque wrench,
53.
tighten screw (AF) to 15-20 Ib-ft (20-27 N.m)
and go to step 73.
Using 9/16 inch wrench, adjust shifting rod
54.
bearing end (AG) clockwise until shifting rod
(AJ) is past hole (AK).
55. Using 9/16 inch wrench, remove screw (AM).
56. Using 9/16 inch wrench, install screw (AF) through clevis (AH) and shifting rod bearing end (AG).
57. Using crowfoot and torque wrenches, tighten jamnut (AD) to 15-20 Ib-ft (20-27 N-m).
58. Using 9/16 inch socket and torque wrench, tighten screw (AF) to 15-20 Ib-ft (20-27 N.m).
Go on to Sheet 10
TA253368
11-10 Change 1

