|
||
|
|
||
| |||||||||||||||
|
|
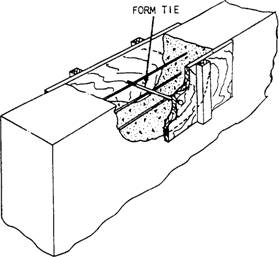
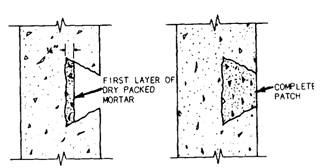
FORM REMOVAL Forms should, whenever possible, be left in place for the entire curing period. Since earl y form removal is desirable for their reuse, a reliable basis for determining the earliest possible stripping time is necessary. Some of the early signs to look for during stripping are no excessive deflection or distortion and no evidence of cracking or other damage to the concrete due to the removal of the forms or the form supports. In any event, forms must not be stripped until the concrete has hardened enough to hold its own weight and any other weight it may be carrying. The surface must be hard enough to remain undamaged and unmarked when reasonable care is used in stripping the forms. Curing Period Haunch boards (side forms on girders and beams) and wall forms can usually be removed after 1 day. Column forms usually require 3 days before the forms can be removed. Removal of forms for soffits on girders and beams can usually be done after 7 days. Floor slab forms (over 20-foot clear span between supports) usually require 10 days before removing the forms. Inspections After removing the forms, the concrete should be inspected for surface defects. These defects may be rock pockets, inferior quality ridges at form joints, bulges, bolt holes, and form-stripping damage. Experience has proved that no steps can be omitted or carelessly performed without harming the serviceability of the work. If not properly performed, the repaired area may later become loose, crack at the edges, and not be watertight. Repairs are not always necessary, but when they are, they should be done immediately after stripping the forms (within 24 hours). Defects can be repaired in various ways. Therefore, let's look at some common defects you may encounter when inspecting new concrete and how repairs can be made. RIDGES AND BULGES.- Ridges and bulges can be repaired by careful chipping followed by rubbing with a grinding stone. HONEYCOMB.- Defective areas, such as honeycomb, must be chipped out of the solid concrete. The edges must be cut as straight as possible at right angles to the surface or slightly undercut to provide a key at the edge of the patch. If a shallow layer of mortar is placed on top of the honeycomb concrete, moisture will form in the voids and subsequent weathering will cause the mortar to span off. Shallow patches can be filled with mortar placed in layers not more than 1/2-inch thick. Each layer is given a scratch finish to match the surrounding concrete by floating, rubbing, or tooling or on formed surfaces by pressing the form material against the patch while the mortar is still in place. Large or deep patches can be filled with concrete held in place by forms. These patches should be reinforced and doweled to the hardened concrete (figure 7-54). Patches usually appear darker than the surrounding concrete. Some white cement should be used in the mortar or concrete used for patching if appearance is important. A trial mix should be tried to determine the proportion of white and gray cements to use. Before mortar or concrete is placed in patches, the surrounding concrete should be kept wet for several hours. A grout of cement and water mixed to the consistency of paint should then be brushed into the surfaces to which the new material is to be bonded. Curing should be started as soon as possible to avoid early drying. Damp burlap, tarpaulins, and membrane-curing compounds are useful for this purpose. BOLT HOLES.- Bolt holes should be filled with small amounts of grout carefully packed into place. The grout should be mixed as dry as possible, with just enough water so it compacts tightly when forced into place. Tie-rod holes extending through the concrete can be filled with grout with a pressure gun similar to an automatic grease gun. ROCK POCKETS.- Rock pockets should be completely chipped out. The chipped out hole should have sharp edges and be so shaped that the grout patch will be keyed in place (figure 7-55). The surface of all holes that are to be patched should be kept moist for several hours before applying the grout. Grout should be placed in these holes in layers not over 1/4 inch thick and be well compacted. The grout should be allowed to set as long as possible before being used to reduce the amount of shrinkage and to make a better patch. Each layer should be scratched rough to improve the bond with the succeeding layer and the last layer smoothed to match the adjacent surface.
Figure 7-54.-Repair of large volumes of concrete.
Figure 7-55.-Repairing concrete with dry-packed mortar. Where absorptive form lining has been used, the patch can be made to match the rest of the surface by pressing a piece of form lining against the fresh patch. View A of figure 7-56 shows an incorrectly installed patch. Feathered edges around a patch lack sufficient strength and will eventually break down. View B of the figure shows a correctly installed patch. The chipped area should be at least 1-inch deep with the edges at right angles to the surface. The correct method of screeding a patch is shown in view C. The new concrete should project slightly above the surface of the old concrete. It should be allowed to stiffen and then troweled and finished to match the adjoining surfaces. |
|
Privacy Statement - Press Release - Copyright Information. - Contact Us - Support Integrated Publishing |